Have you recently changed your old system to a new one? And searching for the procedure to transfer the QuickBooks to the new system? Well, it may little critical to move QuickBooks to a new computer. But luckily, we have simple procedures to perform this task.
Here we will discuss, the three different ways to transfer QuickBooks to another system. And will know, what can you copied from the old computer and what can’t. Read the article, and continue with us till the end.
Other Recommended Articles:
How to Add, Enter or Edit Opening Balance in QuickBooks
Tips to Troubleshoot Basics with QuickBooks Desktop for mac
Guide to Resolve the QuickBooks Errors 1601, 1603, and 1642
Procedures To Move QuickBooks to a New Computer
There may be various reasons to change the QuickBooks to a new system. But you should know that the experts always recommend not to use QuickBooks Desktop in a system for a long time. Here we have given 3 different ways to move the QuickBooks to the new system.
Before moving towards the procedure, keep these points in your mind;
- keep your QuickBooks product license number.
- Make sure that, there is no running program in your system.
- Also, check that, you have set up your new computer completely.
- Full-speed of internet connection is required.
- Keep a USB drive, having enough free of space to store the QuickBooks backup file.
- And make sure, you have arranged your new computer, according to the QuickBooks Windows compatibility.
Procedure 1: Move QuickBooks Using Migrator Tool
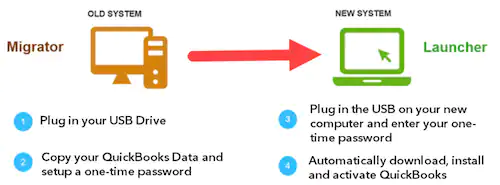
QuickBooks Migrator tool migrates data in QuickBooks. It is the best way to transfer the QuickBooks to a new computer safely. But this procedure can be done if you are the company admin. Here is a little over of the migration tool;
How Does the Migrator Tool Works
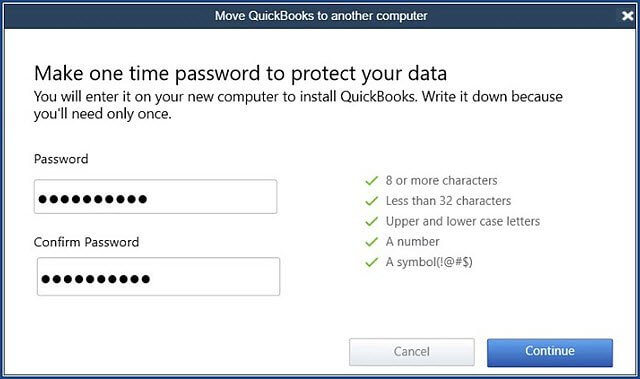
You need to create a complex password to allow yourself to see the copied files, that are transferred from the old computer. to the new computer. This password will be only used only in this tool to unlock the copied file for only one time.
It needs a USB drive to keep the backup file, and it can only take the backup of 3 company files. You need not set up the files manually on your new computer. The QuickBooks migrator tool will set up all of the copied files in your system automatically, without reformating your drive.

Let’s come back to the procedure:
Step 1: Make File Ready on your Old Computer
First, arrange all of the files in one place by following the below steps;
- Open QuickBooks, and click on the ‘File’ menu to select the ‘Utilities’ option.
- Now select the ‘Move QuickBooks to another computer’ option.
- In the next step, select the I’m ready option and create a one time password.
- Choose the USB flash drive, that you will use, by following the on-screen instructions.
- And wait for the files to be copied.
Step 2: Start Migration in Computer
Now in the 2nd step, start the migration process;
- First insert the USB flash drive.
- The migrator tool will not open automatically, due to security restrictions.
- View the files by opening the flash drive.
- Double click on the Move_QuickBooks.bat file to start the migrator
- Now enter the password you have created, and tap on the ‘Let’s Go’ option.

- Wait for some time to finish the process. (The process totally depends on the file size and internet speed of your computer.
In some cases, you may need to update your version of Windows 10, if the migrator doesn’t start after selecting the running file.
After the complete process, the migrator files will be automatically deleted from the USB flash drive, and QuickBooks files will remain on the old computer. But there is a suggestion for you that, rename the file name on the old computer to avoid using the wrong file.
Sometimes, all of the copied data can’t move successfully to the new computer. So you can perform some more steps to recover the files.
- Lgin to the payroll, and payment service., and then to the Intuit data protect.
- Set up a backup scheduled, and move the additional company files to the new computer.
Note: Before moving any kind of file, create a backup file. It will help you from data loss.
Step 3: Register QuickBooks, After the Transfer
- First, visit the ‘Help‘ menu, and go for the ‘Register QuickBooks‘ option to start the process.
- Put the business phone number, and the ZIP code. So that, Intuit can detect the copy of QuickBooks which is already registered. And it will record the registration details for the new computer.
What the Tool will Copy, & won’t Copy
| The tool will copy | The tool will not copy |
|---|---|
| The details of QuickBooks Desktop | Multi-user set up |
| Last 3 company files | payroll and payment set up |
| The custom templates, related files, forms | Intuit data protect |
| Local attachments | Older company files |
| Spell checker | backup files |
| Printer setting (printEng.ini, QBPrint.qbp) | |
| Scheduled & memorized reports | |
| Final Statement designer (FSD clients, FSD data) | |
| Cash flow projector (.cfp) | |
| Business planner (.bpw) | |
| Advanced Reports (for QuickBooks Enterprise) | |
| Statement Writer (for QuickBooks Accountant) | |
| QuickBooks letters and template |
Procedure 2: Transfer QuickBooks Manually
You can manually move QuickBooks to a new computer by creating a backup of your QuickBooks company files. This will save your time and you can restore this backup on the computer in which you are going to install QuickBooks.
Step 1: Create QuickBooks Company File Backup
Create a manual backup of company files, by following the below procedure;
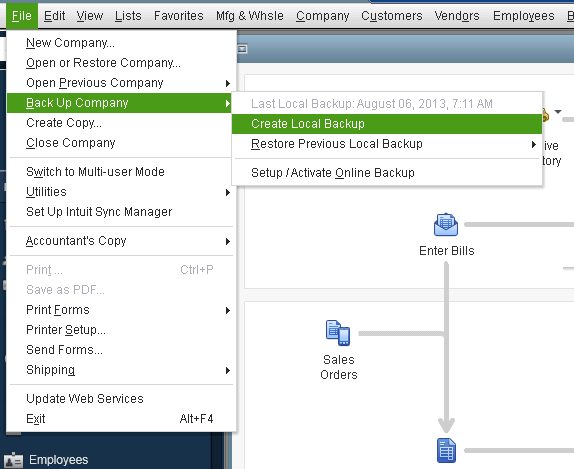
- The first thing you have to do is to create a backup of your file and license information to restore the data again in the newly installed QuickBooks.

- Now go to the new computer and store the QuickBooks backup files.
- Install the latest release of the QuickBooks software in your device, or install the files with a CD.
- After the complete installation, restore the QuickBooks backup files.
- At last, delete the QuickBooks software from the old computer.
Step 2: Restore the Backup File to New Computer
- Insert the storage device in which the backup is stored and then double-click on the QuickBooks icon to open it.
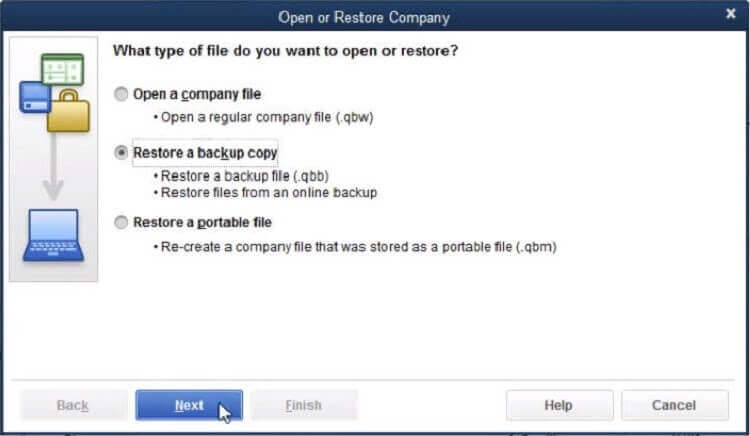
- Go to the ‘File‘ menu and select “Open or Restore Company”.
- Click on the “Restore a Backup Copy” and then the ‘Next‘ option.
- Select the “Local Backup” option to save the file and then go to the next option.

- Then go to the external device where you have stored the backup file and select the file if QuickBooks hasn’t detected it automatically.
- Open the backup file and then provide the location in the new computer where you want to restore the backup of QuickBooks file.
- At last, click on the “Save” button and then wait until the restoration process completes.
Procedure 3: Move QuickBooks Using PC Transfer Software
You can move the QuickBooks by using the PC transfer software. Here is a simple procedure to transfer the QuickBooks to a new computer.
Step 1: Download PC Transfer Software
First of all, download, and install the software (EaseUS Todo PCTrans) on both systems. After that, click on the ‘PC to PC’ option from any one of the systems.
Step 2: Connect the Systems
Follow the procedure to connect the systems;
- Select the other system , by selecting the IP address.
- Enter the account password, and verification code in the system, where you need to transfer files.
- You can find the verfication code from the top-right corner of the software’s main screen.
- Choose the transfer direction, and click on the ‘Connect‘ option.
Step 3: Transfer Files
Now follow the steps carefully to transfer the files;
- Go to the Ápplications‘ tab, and select the Édit‘ option.
- Then visit the ‘List of Applications‘, and search for the QuickBooks option.
- Click ‘Finish‘, and then ‘Transfer‘.
- After the complete transfor process, click ‘Ok‘.
We tried our best to provide the simple procedure to move QuickBooks to a new computer. Hopefully, you find it informative. Still, if you have any kind of doubts regarding this issue then you can contact our certified QuickBooks ProAdvisors through the toll-free number +1-844-405-0904 for the best support.
