Have you accidentally created duplicate accounts, customers, or vendors in QuickBooks Online and are looking for ways to rectify it? Let’s inform you, you can get rid of this from here. we will discuss how you can merge accounts, customers, and vendors in QuickBooks Online. Read the article and make your bookkeeping easier to handle.
If you have duplicate accounts, customers, or vendors, you need to merge them. This is the one and only solution. The merging removes the duplicate account and moves all the data in one account that you want to keep. This displays one-person transactions in one place and keeps your record clean. Start merging with the procedure discussed below.
Procedure to merge Accounts, Customers, and Vendors in QuickBooks Online
Check twice before merging the accounts, customers, or vendors. Make sure to only merge the duplicates that you created by mistake. Let’s start the merging procedure of accounts, customers, and vendors.
Merge Accounts in QuickBooks Online
You can merge two duplicate accounts in QuickBooks Online. But before merging them you should keep the following points in your mind:
- Before merging them make sure you are merging the right accounts.
- It will permanently merge the accounts, you can’t undo this.
- You can’t merge or delete the accounts connected to Online banking.
Now you can go through the merging process.
- If you have reconciliation reports in the merging account, save the report first. The transactions will stay reconciled after merging the accounts.
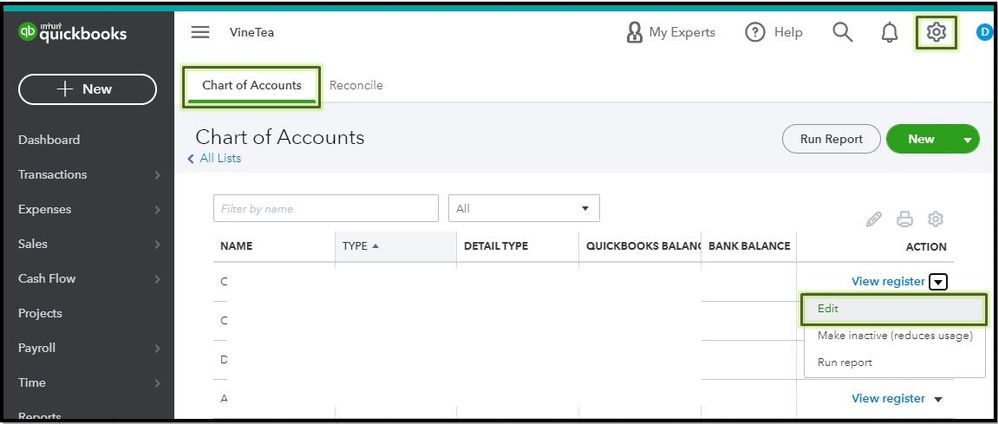
- Go to the ‘Setting‘ tab and choose the ‘Chart of Accounts‘ option.
- Find the account you want to keep. Then click the dropdown next to the Action and select Edit.

Note: If the New category window opens instead of the Account window, then you are creating a sub-account. If you want to create a new parent account, go to accountant view.
- Note the Account Type, Name, and Detail Type of the account and these details must be the same for both accounts you want to merge.
- Check if the Is sub-account option is marked and if it is, note the parent account it is tied to.
- Go to the Chart of Accounts again.
- Find the duplicate account you don’t want to keep. Then click the dropdown next to the Action and select Edit.
- Change the Name and Detail Type. if you mark Is sub-account, note the following points.
- If you are merging two parent accounts, they shouldn’t have any sub-accounts.
- If you are merging two sub-accounts, they should have the same parent account.
- Once you complete, click Save and then Yes to confirm.
Merge Customers in QuickBooks Online
If you have two profiles for the same customer, you should merge them. It will keep your record accurate and correct. But before merging the customers you should keep some points in your mind. Let’s discuss the points:
Points to know before merging a customer in QuickBooks Online:
- The merging process deletes the duplicate profile and moves the data to the profile you want to keep.
- Ensure that both profiles don’t have any sub-customers. If they have, move their sub-customers into regular customers.
Steps to merge customers in QuickBooks Online:
Now you can proceed with the merging process of the customers.
- Go to the Sales and select the Customers option.

- Open the customer profile you want to keep.
- And then click on the Edit option.
- Enter the name of the customer profile you want to keep in the Display name as field. The name should match exactly.
- Hit the Save button and select Yes to confirm.
Other Recommended Articles:
What Are the Top Accounting Software Tools for Small Businesses?
How to Setup & Create New Company File in QuickBooks
Resolve QuickBooks Event Log Error 4 wpr Calling Abort Issue
Merge Vendors in QuickBooks Online
If you have two profiles for the same vendor, you need to merge them. It will delete one profile permanently, you can’t undo them later. Let’s start the merging process.
- Go to the Expenses menu and select the Vendors tab.

- Select the vendor profile that you want to keep and click Edit.
- Note the Display and Company name.
- Go to the Vendors tab again.
- Open the vendor profile that you don’t want to keep and click Edit.
- Change the Display name. The name should be the same as the profile you are merging with.
- Click Save and hit Yes to confirm.
We have discussed the merging procedure of accounts, customers, and vendors in QuickBooks Online. Start merging for yourself and keep it systematically. In case, if you face any issues get instant support with our QuickBooks ProAdvisor. Our expert team can handle every QuickBooks issue and provide you with the best solution. Dial our toll-free number +1-844-405-0904.
