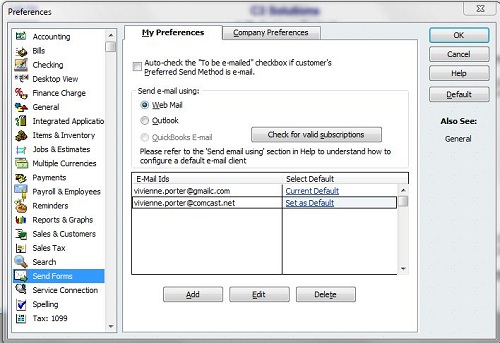
Do you know, ‘How to set up email in QuickBooks Desktop? If ‘No’ then, today’s topic will be interesting for you. Yes, in today’s topic, you will be able to get the solution to the above-mentioned question.
Email is one of the most important part of a business that allows you to communicate with vendors, customers, and suppliers. If you are using different emails separately and getting problems in sending invoices, reporting, transactions then, all things will be shut out through QuickBooks. QuickBooks allows the users to integrate different emails in it. Now we are going to set up emails in QuickBooks Desktop. Let’s start:
Other Recommended Articles:
Fix QuickBooks Desktop Activation Issue (The Incorrect Validation Code)
QuickBooks File Doctor, (Fix Company File & Network Issues)
QuickBooks Install Diagnostic Tool – Download & Usage
Set Up Emails in QuickBooks Desktop:
There are different types of mails which are used in business, like outlook, webmail and etc. Let’s start with outlook mail.
Set up Outlook in QuickBooks Desktop
You need to check the system requirements of QuickBooks to get assured before setting up Outlook in QuickBooks Desktop, and that the Outlook is compatible with the QuickBooks version that you are using. And that time if you are done, follow the given below steps in order to set up Outlook in QuickBooks Desktop.
Step 1: Contact with Email Provider to Get Information
You need to contact with your email provider or to your internet provider to get the below listed information.
- Username & Password
- Outgoing & Incoming email server address
- Incoming email server type
Step 2: Set up Outlook
Follow the steps in order to set up Outlook in QuickBooks Desktop Send Forms preferences:-
- Firstly, go to the QuickBooks Edit menu option.
- Then click on the option of Preferences and Send Forms.
- After that click on the given option of Outlook and OK.
Set Up Secure Webmail in QuickBooks
Important Points to Know Before Starting:
- When you can use secure webmail then Newer versions of QuickBooks.
- This process makes the connection that creates an easier and safer for your email.
- The Secure Webmail is a bit different from webmail as it only works when you link your Intuit account to your webmail account.
- When it linked, that time you do not have to re-enter your QuickBooks password every time you send an email.

QuickBooks Versions that Work with Secure Webmail
- The version of QuickBooks 2019 and 2020, that is available for the Gmail, Yahoo Email, Windows Mail, Hotmail, and AOL. (that is Mozilla Thunderbird Email Client) Supports plain text version in Mozilla.
- The version of QuickBooks 2018, that is available for Gmail and Hotmail/ Live users.
Notes:
- You should add a complex password for your QuickBooks company file if you add Secure Webmail to your file.
- If you are on a network and you’ve set up Secure Webmail, you may still be asked to sign in to your webmail account when you try to send emails through QuickBooks Desktop.
Set Up Secure Webmail
- Go and open the QuickBooks, then click on the option of the Edit menu and then click on the Preferences option.
- Click on the option of Send Forms.
- Then, click on the option of WebMail and Add.
- After that, you can click on the option of your provider from the drop-down and then enter your email address.
- Click on the option of Use Enhanced Security checkbox and then click on the OK option. (If you get an error message that says the Network Error. Please try again then you can unmark the Use Enhanced Security box.)
- Then, sign in to your Intuit account when it is prompted.
Set Up Webmail in QuickBooks Desktop
Important points to know before starting:
- With the help of your ISP, you can verify your webmail servers and port settings.
- Verifying that your account for the two-step verification process that the webmail providers require users to enable their account settings.
- The QuickBooks can auto-fill the required information for some of the most common providers.
Set up webmail
- Firstly, go to the QuickBooks Edit menu option.
- Then click on the option of Preferences and Send Forms.
- Then, click on the option of WebMail and Add.
- Provide the required information in the Add Email Information and then click on the Ok option.
- After that, you can select the OK option to save your changes.
Note:
- QuickBooks will ask you to enter your webmail password the first time you send an email via webmail.
- If QuickBooks is not accepting the password then you should know that the Webmail service providers such as Gmail, Yahoo, etc. require you to set the account setting for two-step verification.
The End Line
We hope that this article will be helpful for you and also hope that you are now able to set up email services in the QuickBooks Desktop. But in case if you are facing any kind of error or issue during this process and you can get our Accountwizy ProAdvisor support for the instant troubleshoot solution.
