QuickBooks Desktop 2023 subscription model is the new updated version of QuickBooks. Intuit officially allowed all its users to download the latest QuickBooks release (R3). If you also want to download and install QuickBooks Desktop 2023 to enjoy the advanced features then read the article till the end.
In this article, we will talk about the download, and install procedure of the QuickBooks Desktop. And will know the two different installation methods to run QuickBooks successfully.
How to Download QuickBooks Desktop 2023
To download QuickBooks Desktop, you are required to visit the official site of Quickbooks. QuickBooks will customize your needs and will show you the right product you want to purchase.
Here, we are going to highlight 2 procedures to download QuickBooks, one is for the normal users (businessmen), and the second one is for the ProAdvisors.
Download QuickBooks as a Businessman
If you want to download QuickBooks directly from the official site as a normal user then, follow the procedure;
- Visit the QuickBooks product official site.
- Choose the version type ‘US or Canada‘ or only ‘US‘.
- After that QuickBooks will ask you some questions to know your needs.
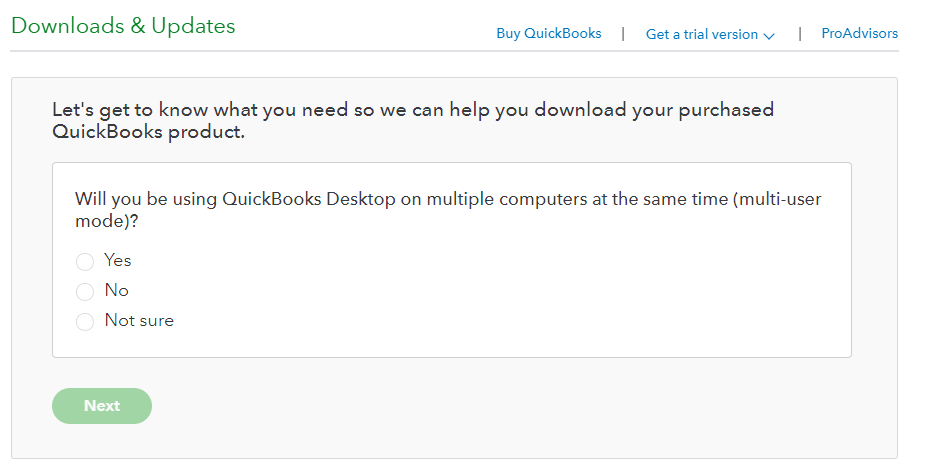
- QuickBooks will ask you for multi-user access with 3 options Yes, No, and Not Sure.

- Choose any one of the options according to your business needs.
- If you are choosing Yes, or Not Sure: QuickBooks will take you to the page of ‘Standard Set Up‘ to choose country, product type, and version type.
- If you choose No: QuickBooks will take you to the page of ‘Express Set Up’ page for the QuickBooks Desktop Manager download. Click on the ‘Download‘ option to enjoy the QuickBooks.
- After choosing the right version in the ‘Standard Set Up‘, click on the ‘Search‘ option.
- QuickBooks will show the product, if it will available in store. There you can click on the ‘Download‘ option to keep it on your system.
Download QuickBooks As a ProAdvisor
If you are a QuickBooks ProAdvisor and want to download the QuickBooks then, follow the procedure;
- First, log in to the self-service account portal.
- And enter the same user ID that you are using for the QuickBooks ProAdvisor profile login, and click on the ‘Continue‘ option to proceed forward.
- Go to the ‘Manage your QuickBooks‘ section, and select the ‘QuickBooks Desktop‘ option.
- Choose the QuickBooks Desktop version, and click on the ‘Download‘ option.
- Install the file, and go to the ‘Details‘ section to get the product detail like license number, product number, and ProAdvisor license number.
Other Recommended Articles:
How to Change Employee Payroll Status in QuickBooks Online
QuickBooks Error OL 301 or 393 (Fix while QuickBooks Connecting to Bank)
QuickBooks Subscription Has Lapsed: Fix the Subscription Error
How to Install QuickBooks Desktop
You can use the QuickBooks Desktop successfully, after the complete installation process. There are some requirements you need to complete before installing the downloaded QuickBooks Desktop file.
Preparation Before Installation
Before installing the downloaded file, you have to cover all these things to install QuickBooks successfully.
- Make sure about the QuickBooks system requirement, and the compatibility of QuickBooks with Windows.
- keep the product, and license number.
- Save the downloaded file in your system, where you can easily access it.
Install the File
Follow the procedure to install the downloaded file;
- Open Windows Explorer, with the short cut keys ‘Windows‘ + ‘E‘.
- Search for the ‘QuickBooks.exe‘ file.
- Right-click on the file, and select the ‘Run as Administrator‘ option.
- Now QuickBooks will instruct you on-screen to run the QuickBooks Desktop.
- Agree, and accept the license agreement, and click the ‘Next‘ option.
Now you have two ways to install the file; Express install, and Custom, and network install. Select any one of the options;
Express Install
Express install is good if you are using QuickBooks for the first time, reinstalling the QuickBooks, or trying to use QuickBooks in another system (in another network).
- First of all, click on the ‘Express’ option and then on the ‘Next’ option.
- After that, select the ‘Install’ option.
- Open the QuickBooks to start it.
Custom and Network Install
The Custom and network install type are good if you have a multi-user network, hosting company files on a server, and or installing QuickBooks in a default location.
- Click on the ‘Custom and Network‘ Options.
- And select the ‘Next’ option.
- Now you have to describe that, how you will use the QuickBooks.
- Then go to the next page and select the ‘Change the install location’ option.
- Browse and put the QuickBooks folder, where you want to place it.
- Click the ‘Next’ option, and start the install.
- After the complete installation process, click on the ‘Open QuickBooks’ to start your work with QuickBooks.
Activate the QuickBooks Desktop
QuickBooks will automatically prompt you to activate the installed QuickBooks Desktop. During that time, you can activate it directly or can activate it manually by following the below procedure;
- Just go to the QuickBooks and open it.
- Visit the ‘Help‘ menu, and click on the ‘Activate QuickBooks Desktop‘ option.
- Verify your info by following the on-screen instructions.
This was everything about the download, and install procedure of QuickBooks Desktop. Hopefully, you find the article informative. Further, if you have any doubts regarding this topic then can hire a QuickBooks ProAdvisor for help.
