From the recent survey report of QuickBooks accounting software, we have noticed that most of the QuickBooks users have the question ‘ How to deactivate multicurrency in QuickBooks Online? ’. If the same question is also strikes your mind then stay with us to get your answer.
Deactivate multicurrency in QuickBooks Online
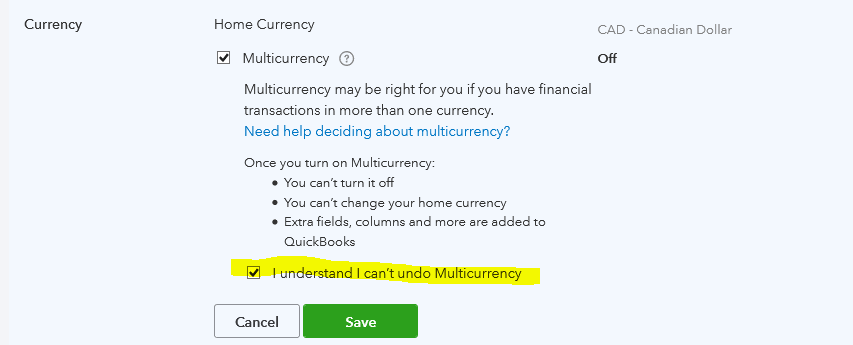
Unfortunately, there is no solution to deactivate the multi-currency mode in QuickBooks, once you turn on the multi-currency mode you can’t turn off it, and also can’t memorize the foreign currency transactions automatically. So those who are not yet activated the QuickBooks Online multi-currency always keep in your mind that you will not be able to deactivate it again.
But yes, if you want to activate multicurrency in QuickBooks, then you can follow the below steps. Before that, I think it will be good to know something about the QuickBooks multicurrency.
QuickBooks multicurrency makes the user able to record transactions in foreign currencies, provides extra support for dealing, allows to create invoices with the proper currency icons, self-corrects in accounts receivable, and etc. A user can track his/her all bank account transactions like vendor transactions, customer transactions, and can exchange rate gains and losses after the turn of QuickBooks multi-currency.
If you want to activate it then follow the below steps, and you will be able to do it if you are a user of QuickBooks Online accounting, QuickBooks Plus, Advanced, and Essentials.
Other Recommended Articles:
QuickBooks Desktop Fields Display Black Instead of White
How to Set Up Voluntary Deductions in QuickBooks Online Payroll
How to Set Up & Record a Vehicle Purchase in QuickBooks
Procedure to turn on multicurrency in QuickBooks:
It is very easy to turn on multi-currency in QuickBooks, you just have to follow the procedure, Let’s do it:

- At first, you have to go to the ‘Settings’ tab, and select the ‘Account and Settings’ option.
- After that click on the ‘Advanced’ option and go for the ‘Edit’ option.
- After clicking on the ‘Edit’ option, you can see the section of ‘Currency’.
- Select the ‘Home Currency’ option from the ‘Currency’ section.
- Then click on the ‘Multicurrency’ checkbox.
- Now click on the ‘Save & Close’ option to finish the process.
How to start using multicurrency in QuickBooks?
To start using or to set up multicurrency in QuickBooks at first you have to follow some steps like adding currencies, deleting currencies, and by adding an account for foreign currency.
Adding currencies:
Add currencies with the below simple process:
- To add currencies in a simple process at first, you have to go to the ‘Setting’ tab, and click on the ‘Currencies’ option.
- After that, click on the ‘Add currency’ option.
- From the drop-down list of ‘Add currency’ choose the ‘New Currency’ option.
- At the end click on the ‘Add’ option.
Deleting of currencies:
Follow the below steps if you want to delete any currency:
- As usual, go to the ‘Setting’ tab, and click on the ‘Currencies’ option.
- Select the ‘Delete’ option from the Small arrow.
- And confirm the delete process by click on the ‘Yes’ option.
- Now you can check that the currency is deleted.
Adding an account for foreign currency:
- First of all, go to the ‘Setting’ option.
- And click on the ‘Charts of Accounts’ option, then on the ‘New’.
- Now you can see a dialog of account, select the exact account type and detail type.
- For the new account, you have to enter a name and go to the ‘currency’ section to choose the foreign currency.
- Now click on the ‘Save & Close’ button.
The Endline:
We hope you will like this blog, and are also be able to use the multicurrency in QuickBooks without facing any issues. We know you are here because of the deactivate procedure of multicurrency in QuickBooks. But we are really sorry that there is no solution to deactivate the multicurrency in QB, hope you understand.
